This blog post covers all you need to know about assembling your trampoline frame.
Please note that these instructions are based on assembling an Atlantic Trampolines trampoline frame, other trampoline frames may vary.
TWO PEOPLE ARE REQUIRED TO ASSEMBLE THE TRAMPOLINE, REMEMBER TO USE GLOVES DURING ASSEMBLY TO AVOID PINCHING
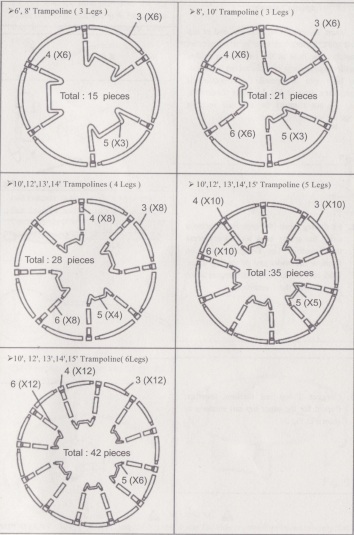
– Check that you have received all parts using the relevant illustrations below. All parts with the same part number are interchangeable and do not have ‘right’ or ‘left’ orientation.
– To connect the parts, simply slide a section of tubing into the adjacent section. These joints are called “T shape sections’
STEP 2: Assemble the frame
1. Insert T-section (#4) into one end of top rail (#3). Ensure the hole in the T-section matches the hole in the rail. Use a rubber mallet if necessary. Use the spring hook tool to help you to spread the T-section if necessary. Repeat for the other T-sections, but do not connect the top rail sections together yet.
2. Fit the leg tubes (#6) onto the T-sections using the spring hook tool to compress the T-section. The T-sections must be fitted to the wider end of the leg tubes. Take care not to pinch your fingers when compressing the T-sections.
3. Connect 2 top rail sections together. Repeat for the other top rail sections as shown in Fig 3.
Fit the W-shape tube (#5) onto the leg tubes (#6) as shown in Fig 4. Make sure they slot into place. Fit the remaining tubes (#5)
5. Turn over the 4 sub-assembled sections and connect them together. Note that at this stage the sections can still be parted. The assembly will become rigid only when the trampoline mat is assembled
6. The completed skeleton should be the same as fig.6
IMPORTANT – It is essential that the intended site for this trampoline is completely flat and level. If the ground is un-level this will cause movement in the frame and could cause stress on the joined sections.
Next step is to fit the trampoline mat. Visit our trampoline guides section for a step by step guide to attaching your trampoline mat.
Author: Bob Bounce


